許子恆老師的上課筆記
建立一個資料夾,我這邊取week13。
在week13資料夾中下指令。
他會自動建立基本的檔案,新版的python會使用pyproject.toml管理套件的版本。
1
2
3
4
5
6
7
8
9
10
11
12
13
14
15
16
// pyproject.toml [project] name = "week13" version = "0.1.0" description = "Add your description here" readme = "README.md" requires-python = ">=3.13" dependencies = [ "altair==4.0", "matplotlib>=3.10.7", "pillow>=12.0.0", "streamlit>=1.51.0", "torch>=2.9.1", "torchvision>=0.24.1", "ultralytics>=8.3.233", ]
以及建立虛擬環境
接著進入虛擬環境(Mac Book)
1 source .venv/bin/activate
1 source .venv/bin/activate
安裝相關套件
1
2
3
4
5
6
uv add streamlit uv add torch torchvision uv add matplotlib uv add ultralytics uv add pillow uv add altair==4.0
1
2
3
4
5
6
uv add streamlit uv add torch torchvision uv add matplotlib uv add ultralytics uv add pillow uv add altair==4.0
到這個網址下載訓練好的模型
https://github.com/fullmakeralchemist/teststream/tree/master
在week13資料夾建立一個weights資料夾。
接著把剛剛github裡面的best.pt檔案放到week13的weights資料夾中。
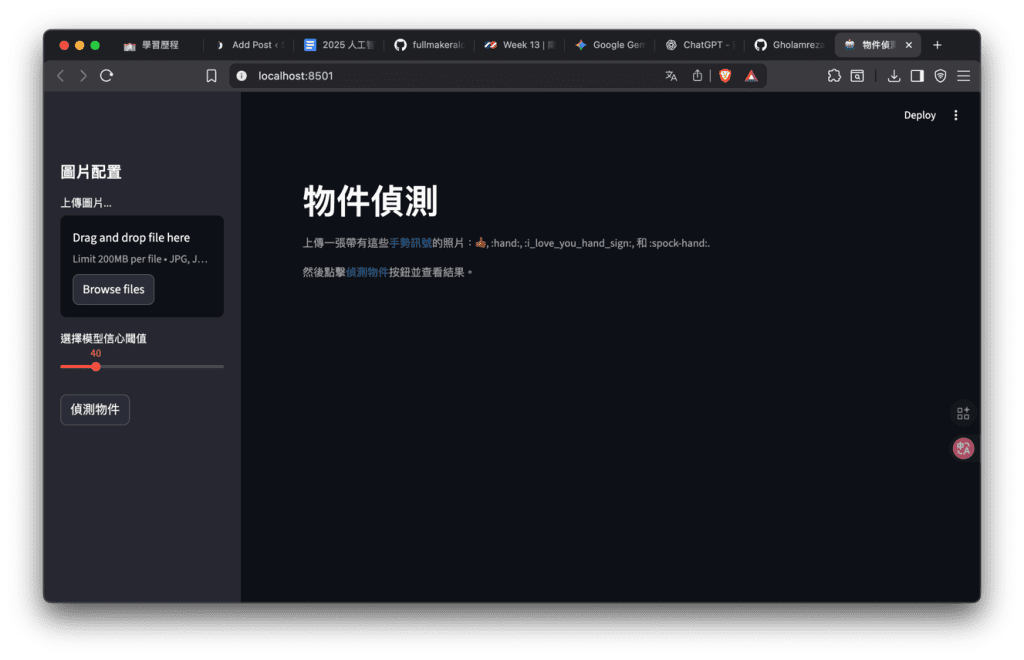
並建立一個app.py
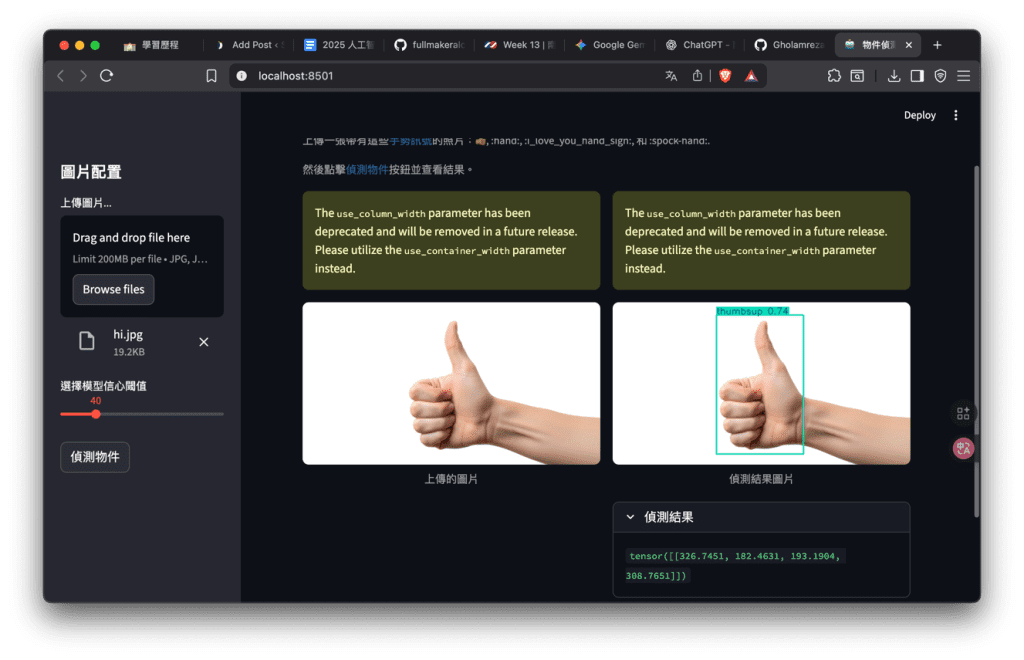
1
2
3
4
5
6
7
8
9
10
11
12
13
14
15
16
17
18
19
20
21
22
23
24
25
26
27
28
29
30
31
32
33
34
35
36
37
38
39
40
41
42
43
44
45
46
47
48
49
50
51
52
53
54
55
56
57
58
59
60
61
62
63
64
65
66
67
68
69
# 匯入所需的函式庫 import PIL import streamlit as st from ultralytics import YOLO <div></div> # 替換成您的權重檔案的相對路徑 model_path = 'weights/best.pt' <div></div> # 設定頁面佈局 st.set_page_config( page_title="物件偵測", # 設定頁面標題 page_icon="🤖", # 設定頁面圖示 layout="wide", # 設定佈局為寬版 initial_sidebar_state="expanded", # 預設展開側邊欄 ) <div></div> # 建立側邊欄 with st.sidebar: st.header("圖片配置") # 在側邊欄新增標題 # 在側邊欄新增檔案上傳器,用於選擇圖片 source_img = st.file_uploader( "上傳圖片...", type=("jpg", "jpeg", "png", 'bmp', 'webp')) <div></div> # 模型選項 confidence = float(st.slider( "選擇模型信心閾值", 25, 100, 40)) / 100 <div></div> # 建立主頁面標題 st.title("物件偵測") st.caption('上傳一張帶有這些:blue[手勢訊號]的照片::+1:, :hand:, :i_love_you_hand_sign:, 和 :spock-hand:.') st.caption('然後點擊:blue[偵測物件]按鈕並查看結果。') # 在主頁面建立兩個欄位 col1, col2 = st.columns(2) <div></div> # 如果圖片已上傳,則將圖片新增到第一個欄位 with col1: if source_img: # 開啟上傳的圖片 uploaded_image = PIL.Image.open(source_img) # 將上傳的圖片新增到頁面,並附上標題 st.image(source_img, caption="上傳的圖片", use_column_width=True ) <div></div> try: model = YOLO(model_path) except Exception as ex: st.error( f"無法載入模型。請檢查指定的路徑:{model_path}") st.error(ex) <div></div> if st.sidebar.button('偵測物件'): res = model.predict(uploaded_image, conf=confidence ) boxes = res[0].boxes res_plotted = res[0].plot()[:, :, ::-1] with col2: st.image(res_plotted, caption='偵測結果圖片', use_column_width=True ) try: with st.expander("偵測結果"): for box in boxes: st.write(box.xywh) except Exception as ex: st.write("尚未上傳圖片!")
1
2
3
4
5
6
7
8
9
10
11
12
13
14
15
16
17
18
19
20
21
22
23
24
25
26
27
28
29
30
31
32
33
34
35
36
37
38
39
40
41
42
43
44
45
46
47
48
49
50
51
52
53
54
55
56
57
58
59
60
61
62
63
64
65
66
67
68
69
# 匯入所需的函式庫 import PIL import streamlit as st from ultralytics import YOLO # 替換成您的權重檔案的相對路徑 model_path = 'weights/best.pt' # 設定頁面佈局 st.set_page_config( page_title="物件偵測", # 設定頁面標題 page_icon="🤖", # 設定頁面圖示 layout="wide", # 設定佈局為寬版 initial_sidebar_state="expanded", # 預設展開側邊欄 ) # 建立側邊欄 with st.sidebar: st.header("圖片配置") # 在側邊欄新增標題 # 在側邊欄新增檔案上傳器,用於選擇圖片 source_img = st.file_uploader( "上傳圖片...", type=("jpg", "jpeg", "png", 'bmp', 'webp')) # 模型選項 confidence = float(st.slider( "選擇模型信心閾值", 25, 100, 40)) / 100 # 建立主頁面標題 st.title("物件偵測") st.caption('上傳一張帶有這些:blue[手勢訊號]的照片::+1:, :hand:, :i_love_you_hand_sign:, 和 :spock-hand:.') st.caption('然後點擊:blue[偵測物件]按鈕並查看結果。') # 在主頁面建立兩個欄位 col1, col2 = st.columns(2) # 如果圖片已上傳,則將圖片新增到第一個欄位 with col1: if source_img: # 開啟上傳的圖片 uploaded_image = PIL.Image.open(source_img) # 將上傳的圖片新增到頁面,並附上標題 st.image(source_img, caption="上傳的圖片", use_column_width=True ) try: model = YOLO(model_path) except Exception as ex: st.error( f"無法載入模型。請檢查指定的路徑:{model_path}") st.error(ex) if st.sidebar.button('偵測物件'): res = model.predict(uploaded_image, conf=confidence ) boxes = res[0].boxes res_plotted = res[0].plot()[:, :, ::-1] with col2: st.image(res_plotted, caption='偵測結果圖片', use_column_width=True ) try: with st.expander("偵測結果"): for box in boxes: st.write(box.xywh) except Exception as ex: st.write("尚未上傳圖片!")
執行 streamlit run app.py
上傳圖檔,按下偵測物件